-
Числа №14. Фиксированная запятая
Мы много говорили о числах с плавающей запятой. Есть и другой формат – дробные числа с фиксированной запятой. Давайте кратко их рассмотрим.
Об этих числах я упоминал в заметке о первой Playstation. Это эмуляция дробных чисел для архитектур без математического сопроцессора. Главное их преимущество в том, что все операции с ними выполняются как целочисленные.
У фиксированных чисел, как ясно из определения, дробный разделитель не плавает туда-сюда. Например, мы решили, что после запятой хранится два разряда, и так будет всегда. Не нужно нормализовать числа и приводить их к общим экспонентам.
Число с фиксированной запятой хранится как целое, умноженное на некий коэффициент. Для простоты рассмотрим десятичные числа. Будем хранить цены в рублях с двумя десятичными знаками (копейками):
Кофе     80.99
Булочка 115.50
Коэффициент равен
10^-2(или 0.01), а их целые представления равны:Кофе 8099 Булочка 11550Складываются и вычитаются такие числа в одну машинную команду. Найдем сумму покупки:
  1
 8099
11550
-----
19649
Приведем к дробному виду, чтобы были видны копейки:
19649 * 10^-2 = 196.49Это было сложение, а теперь рассмотрим умножение. Умножать булочку на кофе немного странно, но давайте не думать об этом.
Числа 80.99 и 115.50 можно записать таким образом:
 80.99 =  8099 * 10^-2
115.50 = 11550 * 10^-2
Их произведение:
8099 * 10^-2 * 11550 * 10^-2Две степени десяти схлопываются в одну:
-2 + -2 = -48099 * 11550 * 10^-4Умножение на степень десяти равносильно тому, чтобы сдвинуть разряд влево или вправо. Произведение
8099 * 11550дает93543450, и нужно сдвинуть разделитель влево на 4 позиции. Результат:9354.3450Однако мы храним только две цифры после запятой. Поэтому хвост
3450округляется до двух знаков. Цифра 5 округляется вверх, и на конце оказывается 35:9354.35Целое (внутреннее) представление становится таким образом
935435.Вот как устроены числа с фиксированной запятой.
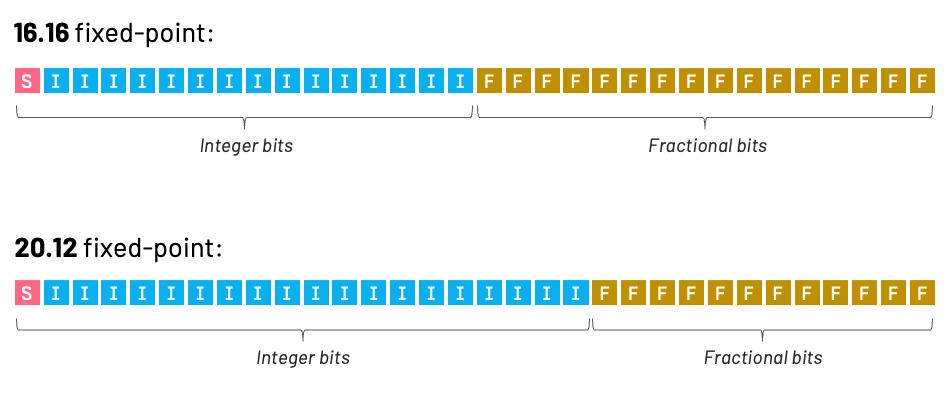
Выше мы рассматрели их в десятичном виде, потому что так удобней. В двоичном виде происходит то же самое. Договариваются, что первые 16 бит хранят целую часть, а остальные 16 – дробную. Сокращенно записывают так:
Q16.16. Могут быть и другие варианты: больше бит на целую часть (Q24.8) или наоборот – на дробную (Q8.24). Вместо десятичного сдвига происходит битовый силами процессора.С такими числами работали игровые консоли вроде Playstation, Sega Saturn и GameBoy. Очевидный их минус в том, что, во-первых, диапазон значений гораздо ниже, чем у float. Во-вторых, нужно следить за переполнением целой части. Чтобы не допустить переполнения, числа приводят к аналогам, где у целой части больше бит. Например, конвертируют Q16.16 в Q24.8, выполняют расчеты, а затем возвращаются к Q16.16.
Раньше числа с фиксированной запятой использовались часто. Например, в Doom для расчета углов; в LaTeX для растеризации шрифтов; в ранних играх Blizzard (Starcraft).
В следующей заметке я хочу рассказать о Старкрафте: какую роль в нем играли числа с фиксированной запятой и почему разработчики не использовали целые.
-
Числа №13. Ошибка Pentium FDIV
Еще одна кулстори на тему чисел с плавающей запятой.
Мы привыкли, что железо не ошибается, но иногда бывает обратное. В 1994 году Intel выпустила первые процессоры линейки Pentium. Процессоры эти печально прославились тем, что неправильно считали некоторые флоаты (инструкция FDIV). Вот это правильный результат:
4195835,0/3145727,0 = 1,333820449136241002А вот что выдавал бракованный процессор:
4195835,0/3145727,0 = 1,333739068902037589Казалось бы, ошибка начинается с четвертой цифры после запятой, пустяки. Но вот что случиться, если поделить и умножить на одно и то же число:
(4195835/3145727)*3145727 = 4195835против
(4195835/3145727)*3145727 = 4195579Разница 256 – прилично.
Ошибку обнаружил ученый Томас Найсли. Он написал код, проверяющий процессор на корректность, уведомил Intel об ошибке и вообще сделал многое для того, чтобы о проблеме узнали.
Реакция Intel была потрясающей. Во-первых, в фирме знали о неверных операциях с числами, но считали, что проблема коснется только узкого круга лиц. Во-вторых, компания предложила замену процессора только тем, кто докажет, что испытывает проблемы. Мол, если ты хомяк, купивший процессор ради Doom, тебе и так сойдет.
К счастью, реакция общества, конкурентов и даже партнеров Intel была крайне негативной. Уже тогда процессорам доверяли лифты, оборудование, самолеты. Было ясно, что процессор, который неверно считает – это тикающая бомба. В результате Intel все-таки заменила процессоры, и общий убыток составил 475 миллионов долларов. Даже сегодня это много, а в 1994 году сумма была космической.
Проблема Пентиума коснулась и софта. В компиляторы Delphi, Basic и других языков добавили костыль: если текущий процессор равен “Pentium такой-то”, то операции с числами эмулируются программно. Это и замедление вычислений, и лишний код в компиляторе.
Больше Intel не позволяла себе таких фокусов. Наработки Томаса Найсли включили в процесс верификации процессоров, чтобы не допустить ошибок в будущем.
Почитать об ошибке Pentium FDIV можно в Википедии; есть краткая версия статьи на русском. На Ютубе по словам Pentium FDIV ищутся подробные разборы ошибки.
-
Числа №12. Числа в приставках
Думаю, с числами мы разобрали самые сложные моменты. Приведение к двоичной дроби, нормализация, битовый формат, сложение – все это мы прошли. Тему пора заканчивать, и чтобы плавно из нее выйти, расскажу несколько шуток-прибауток.
Первая из них в следующем. Мы привыкли, что числа с плавающей запятой есть в каждом утюге. Так было не всегда: ранние процессоры считали только целые числа. Дробные, если они были нужны, писали вручную. Использовали комбинации шагов, что мы рассмотрели. Конечно, это был бардак: представьте, что числа складываются по-разному в разрезе даже не компиляторов, а их версий. Именно из этого бардака вышел стандарт IEEE 754 Floating Point Arithmetics.
Позже в компьютерах появился математический сопроцессор. Среди прочего он считал не только флоаты, но и тригонометрию, степени и логарифмы. Сегодня такой сопроцессор является частью любого процессора, но раньше был отдельным устройством.
Какое-то время математический сопроцессор был дорогим удовольствием. Его не было в игровых приставках. Поскольку они ориентированы на массового потребителя, то устроены максимально дешево. Игры под них писали без использования флотов.
Скорее всего, вы подумали о приставках типа Денди и Сеги. Все верно, но мат-сопроцессора не было и в приставках более высокого класса, например Playstation! Да, первая плойка ничего не знала про числа с плавающей запятой, но при этом стала прорывом в индустрии.
Как же выкручивались разработчики? На Playstation были спортивные симуляторы, стратегии, писишные порты Quake 2 или Diablo. Все это добро работало на целых числах. Если точнее, сишный SDK для Playstation предлагал эмуляцию дробных чисел в двух вариантах: 16/16 или 20/12. Цифры означают число бит под целую и дробные части.
Операции с такими числами выполнялись медленно, потому что раскладывались в серию машинных команд. Но графический процессор Playstation, который воплощал цифры в полигоны и вершины, не знал ни про какие дробные числа. Он работал только с целыми – пикселями.
Из-за того, что пикселей приставка выдавала немного, некоторые объекты дребезжали – чуть подергивались. Это называлось Jitter и было особенно заметно в играх “а-ля Кодзима”, то есть с закосом под кинематографичность. Сцены на движке игры, плавные движения камеры… при малейшем ее смещении объект мог дернуться на несколько пикселей, потому что все расчеты были в целых числах. Отсюда эти дребезжания и подергивания. Частично эту проблему решили в эмуляторах.
Материал этой заметки основан на статье How PlayStation Graphics & Visual Artefacts Work. Я прочитал ее пару лет назад и был поражен сложностью, на которую шли инженеры и программисты, чтобы порадовать нас – школьников-нищебродов. Спасибо им за игры, сюжеты, контент, на котором я вырос. Не все мои друзья увлекались плейстейшеном, но для меня он был главным увлечением и дал много пищи для ума.
-
Числа №11. Большие десятичные типы
Из прошлых заметок ясно, почему Float нельзя использовать для денег: вы не контролируете точность. В этих случаях говорят: используйте классы
BigIntegerиBigDecimal. Они хранят циклопические числа с гарантией точности. Что это за классы такие и как они устроены?Вспомним, что целое число можно представить массивом разрядов. При сложении разряды складываются и проверяется переполнение. Если оно было, то к следующему разряду прибавляется единица и так далее.
Условный класс
BigIntegerустроен именно так: он хранит знак и числовой массив. Каждый его элемент — разряд. При этом разряд очень велик: как правило это integer, то есть около двух миллиардов! За счет этого достигается невероятная емкость. Если в каждом элементеMAX_INTзначений, а всего их — тожеMAX_INT, то итоговое число равноMAX_INT ^ MAX_INT, то есть два миллиарда в степени два миллиарда. Наверное, если бы каждый атом был Вселенной, то и тогда итоговое число атомов не превысило бы этой цифры.
Складываются такие числа поразрядно, в столбик. Берутся нулевые элементы массивов и суммируются как два integer с учетом переполнения. Если оно было, в нулевой разряд идет остаток, а в следующий накидывается единичка. Аналогично устроено вычитание.
Класс
BigDecimalустроен просто: этоBigIntegerс данными о том, сколько разрядов хранится после десятичной запятой. Как и в случае сFloat, при сложении и вычитании число “плавает”, но на этот раз без потери точности. Мы не ограничены 32 битами, в нашем распоряжении вся оперативная память.Получается, что условные
BigDecimalиBigInteger— это программная эмуляция больших чисел. Операции над ними раскладываются в серию машинных команд, например когда складываются два разряда. Однако таких разрядов много, плюс мы проверяем переполнение вручную. Такие операции очень медленны в сравнении с теми, что выполняются на процессоре. Поэтому к программной эмуляции прибегают только если точность критически важна.Postgres предлагает тип
numeric— высокоточное хранилище чисел. Он хранит знак, масштаб и точность — сколько разрядов выделить на число и сколько проходится на дробную часть. Далее идет массив типаshort[]— двухбайтовых элементов. Каждый элемент — это разряд от 0 до 9999; их число не ограничено.Один элемент хранит 10.000 значений, два элемента — 100.000.000 значений. Три — накиньте еще четыре нуля и так далее. Складываются
numericкак описано выше, только переполнение проверяется для порога в 10 тысяч.Почему в Postgres выбрали именно такой порог, я не знаю. Скорее всего, это ускоряет десятичные операции, например умножение на десятки, деление на сто и так далее.
Если вы пользуетесь
numeric, обязательно указывайте точность. Иначе возможна ситуация, когда в целой части, скажем, 123, а в дробной — километровый хвост.Numericотносится к типам произвольной длины, и если значение не поместиться в 512 байтов (или около того), то будет сброшено в TOAST-хранилище. Проблемы можно избежать, указав точность:sum numeric(15, 2).Впрочем, даже столь мощные десятичные типы бывают избыточны. Иногда деньги хранят в микроцентах, положение на плоскости — в нанометрах и так далее. Типа
longвполне хватает для этого. Главное — найти такой масштаб, в рамках которого вам удобно. -
Числа №10. Десятичное представление
Предположим, мы объявили переменную x, равную 0.1:
float x = 0.1Мы выяснили, что под капотом она становится следующим набором битов:
0 1111011 10011001100110011001101Однако если мы напечатаем x, число предстанет в понятном виде:
println(x)
# 0.1
Стало быть, некий алгоритм приводит двоичную колбасу к десятичному виду обратно. Какой же?
Наивное решение в том, привести двоичную дробь к десятичной, суммируя степени двойки. Говоря проще, бит N умножается на 2 в степени -N, и все это суммируется, после чего умножается на два в степени экспоненты. Пример на псевдокоде:
sum(for n in [0..p]: get_bit(n) * 2^(-n)) * 2^eгде
p– точность (число бит),n– номер текущего бита,e– экспонента. Картинка с формулой: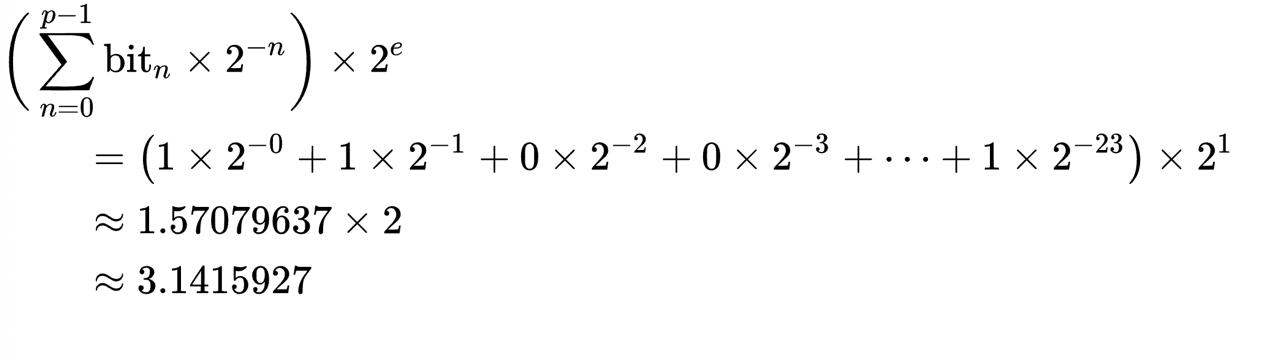
Это математическая формула; она предполагает, что у нас бесконечная точность и ресурсы для вычислений. Это, конечно, не так. Также обратите внимание, что получается порочный круг: чтобы привести число с плавающей запятой к строке, нужно выполнить много других операций с плавающей запятой.
Должен быть алгоритм, который в идеале:
- выполняется за константное время;
- использует только целочисленные операции и битовый сдвиг;
- обратим: если привести строку к float обратно, получим тот же набор битов.
Такие алгоритмы есть, вот некоторые из них: Dragon4, Grisu, Ryū, Giulietti, Dragonbox.
Я немного повозился с Giulietti, потому что именно он используется в большинстве JVM. Если у вас открыта Идея, перейдите в класс
java.lang.Float, методtoString. Вы провалитесь в классFloatToDecimal.javaи найдете там реализацию Giulietti. В шапке файла ссылка на академический пейпер с описанием алгоритма.Скажу честно, я не осилил алгоритм во всех деталях. Он сводится к тому, чтобы найти два целых числа, между которыми заключено исходное число. Затем при помощи целочисленных операций и сдвигов найти такое дробное число, которое при заданной точности неотличимо от исходного.
Реализацию на C++ с подробным разбором можно посмотреть в этой статье: https://vitaut.net/posts/2025/smallest-dtoa/
В этой заметке мне нечем похвастать: чтобы разобраться с алгоритмами, нужно хорошо понимать математику и природу чисел. Математик из меня такой себе, так что я просто делюсь с вами ссылками – может, кто-то объяснит простыми словами.
Вывод такой: приведение плавающих чисел к десятичным строкам – тоже незаурядная задача.
-
Числа №9. 0.1 + 0.2
Переходим к кульминации. В этой заметке мы рассмотрим, как складываются числа 0.1 и 0.2. Итак…
Напомню, что десятичное 0.1 в двоичном виде выглядит как бесконечная периодическая дробь:
0.0(0011) * 2^0Нормализуем ее: сдвинем точку за первый единичный бит:
1.1(0011) e^-4Обрежем дробную часть до 23 бит. Можно сделать это в лоб: выбросить все биты после двадцать третьего (пробел означает границу):
10011001100110011001100 11001100110011...Современные компиляторы поступают иначе: они округляют биты, которые не поместились. Если первый отброшенный бит равен 1, он переносится к младшему разряду. Если там тоже единица, они складываются и таким образом передают перенос вперед.
Это наш случай: видим, что отброшенная часть начинается с 1. Это значит, единица переходит в конец фиксированной части. Она кончается на ноль, к нему прибавляется единица, и получается вот что:
10011001100110011001101Это была мантиса. Экспонента равна -4, к ней прибавляется 127, в двоичном виде получается 1111011. В итоге десятичное 0.1 становится следующим массовом:
0 1111011 10011001100110011001101Теперь 0.2. Это тоже периодическая дробь вида 0.(0011). Для нормализации ее нужно сдвинуть на три позиции:
1.1(0011) e^-3Экспонента: -3 + 127 = 124 = 1111100 в двоичном виде. Разделим мантиссу по границе 23 бит. Видим, что она тоже округляется, потому что первый бит отброшенной части начинается с единицы.
10011001100110011001100 11001100110011...
10011001100110011001101
Итого, 0.2 =
0 1111100 10011001100110011001101в битовом виде. Эти два массива нужно сложить, но есть нюанс.Для сложения и вычитания дробных чисел у них должна быть одинаковая экспонента. Сейчас экспоненты разные: -4 и -3. Поэтому одно из чисел денормализуют так, чтобы степени совпадали. Обратите внимание: это второй раз, когда число “плавает”. Первый раз мы двигали разделитель при нормализации, теперь делаем это опять.
Вопрос: какое число двигать? Если двигать биты влево, есть шанс, что потеряются левые биты, а если вправо – правые. Вспомним, что биты идут по убыванию значения. Самый левый бит оказывает наибольший вклад в число, а самый правый – наименьший. Поэтому если двигать число, то так, чтобы биты ехали вправо. Сдвиг вправо аналогичен делению на два, а значит – степень растет. Из этого вывод: берем то число, у которого степень меньше и подгоняем под ту, что больше.
В нашем случае это 0.1, потому что степень -4 меньше, чем -3 у 0.2. Поэтому приведем 0.1 к степени -3. Напомню, число 0.1 мы выразили так:
1.10011001100110011001101 e-4Сдвиг:
0.110011001100110011001101 e-3Отсекаем последний бит (в данном случае он не округляется, а именно отбрасывается, почему — понятно не до конца):
0.11001100110011001100110 -3Теперь у обоих числа одинаковая степень:
 0.11001100110011001100110  -3
 1.10011001100110011001101  -3
Складываем их побитово в стобик:
1   11  11  11  11  11
 0.11001100110011001100110  -3
 1.10011001100110011001101  -3
10.01100110011001100110011  -3
Получилось
10.01100110011001100110011 e-3. Однако это не окончательный результат – число не нормализовано. Результат операции нужно снова нормализовать, и это уже третий раз, когда число плавает! Сдвинем разделитесь влево и уменьшим степень. Получится вот что:1.001100110011001100110011 e-2Один правый бит не влезает и отсекается:
1.00110011001100110011001 1 e-2Поскольку он равен единице, то происходит округление: он переходит к правому биту остатка, но там уже единица. Две единицы складываются, получается ноль, а перенос уходит в предпоследний бит, где сейчас ноль.
Результат:
1.00110011001100110011010 e-2Последний шаг: битовая упаковка. Знак положительный, первый бит ноль. Экспонента
-2+127=125 = 01111101в двоичном виде. Итого:0 01111101 00110011001100110011010Если привести эту штуку к десятичному виду, она даст примерно 0.3 с кучей нулей и четверкой на конце. Но и это — лишь примерное предствавление, о котором мы поговорим в следующей заметке.
Такой набор шагов выполняется каждый раз, когда вы складываете или вычитаете числа с плавающей запятой. Маловероятно, что у обоих чисел окажется одинаковая степень, поэтому битовых сдвигов вам не избежать. А сдвиги – это почти всегда потеря точности.
Пример показывает, как точность теряется во многих местах. Во-первых, оба числа приводятся к двоичному виду с потерей битов, которые не влазят мантиссу. Во-вторых, мы сдвинули первое число, чтобы добиться одинаковых экспонент. Это была еще одна потеря. В третий раз мы нормализовали результат, а это еще один сдвиг и хоть и малая, но потеря точности.
-
Числа №8. Битовый формат
В этой заметке мы рассмотрим, как числа с плавающей запятой хранятся в памяти. Напомню, что в прошлый раз мы говорили о нормализации, и это был второй этап (после приведения десятичной дроби к двоичной).
Нормализованную дробь нужно хранить в битовом контейнере и при этом выдержать несколько требований. Запись должна быть плотной, чтобы вместить больше информации. Борьба идет за каждый бит. В идеале запись должна упростить некоторые операции, например, чтобы мы проверяли только конкретные биты, а не все число.
Еще запись должна быть монотонной: накрутка битов как в целом числе должна монотонно увеличивать вещественное число.
Давайте запишем несколько нормализованных дробей:
 1.110011101 * 2^3
-1.010101 * 2^10
 1.001 * 2^6
-1.11101 * 2^100
Что между ними общего? Все их можно выразить тремя показателями:
- был ли спереди минус;
- степень двойки;
- биты дробной части.
Возьмем наше любимое число
-42.515625. В нормализованном виде оно равно:-1.01010100001 * 2^5Тройка его параметров выглядит так:
- 1 (впереди минус);
- 5 (степень);
01010100001(биты).
Вопрос: почему не учитывается целая часть? Та самая единица перед разделителем. Ответ – у нормализованной дроби целая часть всегда равна единице, поэтому она не хранится, а подразумевается. Имея тройку
(1, 5, 01010100001), получим исходное число:-1.01010100001 * 2^5Далее тройка записывается в 32 бита (4 байта). Старший бит хранит знак, еще восемь бит – степень. На дробную часть остается 23 бита, она называется мантиссой. И напомню – целая часть дроби, равная единице, подразумевается.
Со степенью есть одна тонкость: она записывается со смещением 127 (половина размерности). Смысл в том, чтобы записать знаковое число как беззнаковое. Это необходимо, чтобы обеспечить монотонное возрастание числа при накрутке битов. Так, к степени 5 будет прибавлено 127 и получится 132. В двоичном виде это 10000100.
Итак, в битовом виде число -42.515625 равно:
1 10000100 01010100001000000000000Пробелы разделяют смысловые части: знак, экспоненту с выравниванием, мантиссу. Битов 32, и они помещаются в 4 байта. Как с ними работать, рассмотрим позже.
Float определяет особые числа. Прежде всего это ноль, когда все биты нулевые. Особенность нуля в том, что его нельзя нормализовать. Помните, мы двигали разделитель, пока он не окажется за первым единичным битом? С нулем это невозможно – такого бита нет.
Еще одно интересное число – минус ноль:
1 00000000 00000000000000000000000Минус ноль полезен в инженерных расчетах, например при сходимости рядов. Есть ряды, которые стремятся к нулю, но попеременно слева и справа. Минус ноль означает, что дальнейшие вычисления дают ноль и при этом мы были слева от нуля.
Другие интересные случаи:
- экспонента 11111111, мантисса = 0 -> бесконечность (может быть отрицательной за счет первого бита)
- экспонента 11111111, мантисса не равна 0 -> NaN
- экспонента 0000000, мантисса не равна 0 -> субнормальные числа.
Субнормальные числа выровнены так, что экспонента равна нулю. Они поддерживаются процессорами, однако требуют внутренних преобразований.
Особые числа нельзя получить в лоб: чаще всего для этого возводят специальные флаги процессора, чтобы при
NaNне возбуждалось исключение. Ну или у вас JavaScript.В следующей заметке я планирую рассмотреть, как процессор складывает два числа с плавающей запятой.
-
Числа №7. Нормализация
Возвращаемся к числам. Мы выяснили, что любая десятичная дробь приводится к двоичной чередой делений и умножений на два. Чаще всего вы получите периодическую дробь как в случае с 0.1. Но бывают и удачные варианты: например, число
42.515625в двоичном представлении дает101010.100001.Легко заметить: проблем не создают те десятичные числа, которые являются половинками, четвертинками, восьмушками и так далее. Объяснение простое: помните таблицу умножения на 2 из прошлой заметки? Мы останавливаемся, когда получаем единицу, вычитаем из нее единицу и получаем ноль. Это значит, что очередное умножение должно вернуть 1. Если размотать алгоритм назад, на предыдущем шаге должно быть 0.5, перед ним — 0.25 и так далее.
Поэтому 25% — это ок: в двоичном виде 0.25 будет 0.01. А 10% — не ок: 0.1 будет
0.0(0011). Двоичная природа дает о себе знать.Хорошо, мы привели десятичную дробь к двоичной, что дальше? Как ее хранить? Наивное решение — выделить группу бит под целую и дробные части отдельно. Например, если float занимает 4 байта, разделим его пополам: по два байта под каждую часть. В два байта умещаются числа от -32,768 до 32,767. Выходит, подобный float сможет хранить числа от -32,768.32768 до 32,767.32767. Не густо, если сравнить с нормальным float.
Стандарт чисел с плавающей запятой предусматривает другой принцип хранения. Первый шаг на пути к нему — нормализовать двоичную дробь. Возьмем число 42.515625, которое привели к двоичному виду:
101010.100001Это же число я могу представить так:
101010.100001 * 2^0Оператор “крышка” означает возведение в степень. Два в нулевой степени равно единице, поэтому такое умножение ничего не изменит.
Далее: я могу побитово сдвинуть число влево или вправо и компенсировать это степенью двойки. Например, если я передвину точку влево, это равносильно тому, что поделить число на 2. Чтобы уравновесить это деление, я умножу число на два — то есть увеличу степень на единицу. Поэтому число можно записать так:
10101.0100001 * 2^(0+1)Оно ничуть не изменилось: это все то же число, только в другой записи.
Теперь сделаем обратное: сдвинем разделитель на два разряда вправо. Это равносильно тому, что дважды умножить число на 2. Чтобы компенсировать умножение, вычтем из степени двойки два:
1010101.00001 * 2^(0+1-2)Выходит, что разделитель можно двигать куда угодно и компенсировать его степенью. Если у нас безграничное число битов, точность не пострадает. Разумеется, на практике это не так: биты конечны, и передвижение разделителя приводит к тому, что их часть отбрасывается.
Так вот: что же значит нормализовать двоичную дробь? Ответ — сдвинуть разделитель так, чтобы он оказался позади первого единичного бита. При этом неважно, в какой части встречается этот бит: целой или дробной. Мы сканируем биты слева направо, находим первый единичный и передвигаем разделитель так, чтобы он был сразу за ним.
С числом
101010.100001 * 2^0нам повезло: оно начинается сразу с единицы (в отличии, скажем, от 0.00001). Потребуется пять сдвигов влево. Это равносильно тому, чтобы поделить число на 2 пять раз. Компенсация степени составит +5. Вот как выглядит нормализованное число:
1.01010100001 * 2^5Этой процедуре подвергаются все числа после перевода из десятичной системы к двоичной.
Теперь вспомним 0.1 — оно становится
0.0(0011)в двоичной системе. Чтобы разделитель оказался за единицей, нужно четыре сдвига вправо. Это равносильно умножению, поэтому степень уменьшается. Вот что было до:0.0(0011) * 2^0и после:
1.1(0011) * 2^-4Обращаю внимание: только сейчас мы рассмотрели ключевое свойство чисел с плавающей запятой — их разделитель плавает! Ни одна из прошлых заметок не раскрывала этого, но теперь вы в курсе. Как мы увидим позже, разделитель плавает и в других случаях, например при сложении чисел. Вот почему в их названии есть слово float.
После нормализации следует третий этап — битовая упаковка, который мы рассмотрим в следующей заметке.
-
Числа №6. 0.1 в двоичном виде
В прошлой заметке был подвох. Чтобы привести десятичную дробь к двоичной, я выбрал число
42.515625. Оно подобрано так, чтобы результат был коротким и без периода. Хорошо, а что нас ждет с другими числами? Давайте проверим.Возьмем самое банальное число: 0.1 (одну десятую). Приведем ее к двоичной дроби. Напомню, что нужно умножать дробную часть на два в цикле. Если результат меньше единицы, пишем ноль. Если больше, то пишем один и вычитаем единицу. Продолжаем до тех пор, пока не получим ноль.
Для 0.1 получается следующая таблица:
| number | x2  | bit | next |
|--------|-----|-----|------|
| 0.1    | 0.2 | 0   | 0.2  |
| 0.2    | 0.4 | 0   | 0.4  |
| 0.4    | 0.8 | 0   | 0.8  |
| 0.8    | 1.6 | 1   | 0.6  |
| 0.6    | 1.2 | 1   | 0.2  |
| 0.2    | 0.4 | 0   | 0.4  |
| 0.4    | 0.8 | 0   | 0.8  |
| 0.8    | 1.6 | 1   | 0.6  |
| 0.6    | 1.2 | 1   | 0.2  |
| 0.2    | 0.4 | 0   | 0.4  |
| 0.4    | 0.8 | 0   | 0.8  |
| 0.8    | 1.6 | 1   | 0.6  |
| 0.6    | 1.2 | 1   | 0.2  |

...

0.1 = 0.0001100110011...
0.1 = 0.0(0011)
Очевидно, образовался повтор из
0011. Цикл никогда не закончится: это дробь с периодом. Как ни утруждайся, точно выразить ее в двоичной системе невозможно. Дело не в запасе точности: будь у нас хоть миллион битов, все равно мы потеряем какую-то часть после запятой.Таблица для 0.1 весьма интересна. Из нее следует, что числа 0.2, 0.4, 0.6, 0.8 и другие тоже приводят к периодическим дробям. Например, 0.2 – это всего лишь 0.1 * 2, то есть очередной шаг итерации. В двоичной системе 0.2 дает 0.(0011), то есть то же самое, только без первого нуля.
Теперь ясно, что происходит, когда вы пишете в коде
float f = 0.1. Десятичное 0.1 приводится к двоичной дроби, и получается0.0(0011)Дробь нормализуется, отсекаются лишние биты, и получается0.00011001100110011001101. Лишние биты могут как отсекаться, так и округлятся в зависимости от компилятора. Именно из-за округления на конце 01, а не 00.Поэтому то, что вы видите как
0.1, в двоичном представлении является0.00011001100110011001101. То же самое происходит с 0.2. Это косвенно дает ответ на вопрос об их сумме. Оба числа лишь приблизительно равны их десятичным литералам. Поэтому сумма тоже равна 0.3 лишь приблизительно.Предлагаю подумать: почему при печати числа 0.1 и 0.2 выглядят адекватно, а их сумма –
0.30000000000000004? Ведь мы выяснили, что в двоичном виде оба они – мешанина нулей и единиц. На это я отвечу в одной из следующих заметок. -
Числа №5. Знакомство с float
Переходим к числам с плавающей запятой, которые для краткости будем называть флотами. Они бывают половинной точности (16 бит), единичной (32, float), двойной (64, double) и больше. Для простоты будем работать с обычным 32-битным флотом.
Как мы выяснили, компьютер хранит числа в двоичном виде. Сложение и вычитание устроены по школьному принципу “в столбик”, и каждый разряд должен быть двоичным числом. По-другому компьютер не умеет – так устроены сумматоры (логические схемы): они принимают битовые входы по одному на разряд и выдают битовую маску разрядов результата. И еще бит переноса или переполнения.
Любое число, объявленное в коде, приводится к двоичному виду. Когда вы пишете в программе:
float f = 42.01нужно понимать, что 42.01 – это еще не число. Это литерал, который задает число. Литерал может быть другим, например 0.53 или
-4.5234e5. Важно, что на этапе лексера он хранится как строка с метаданными, мол, из этой штуки надо извлечь флоат.Дробные числа тоже приводятся к двоичному виду. В примере ниже – двоичная дробь:
1010111.011011Кого-то она вводит в ступор, но ничего особенного в ней нет. Мы привыкли к десятичным дробям, но аналогично записывается дробь с любым основанием. Например, вот дроби в шестнадцатеричной и восьмеричной системах счисления:
0xfa523.ac591
05627.6232
Так что когда вы пишете
f = 42.515625, помните – после компиляции никакого числа42.515625нет. Оно преобразуется к двоичной дроби. Если точнее, это только первый шаг: после преобразования двоичная дробь нормализуется и помещается в специальный битовый контейнер. Но пока что мы рассмотрим только преобразование.Итак, как привести 42.515625 к двоичному виду? С целой частью все просто: делим на два и выписываем остаток, пока не получим ноль. Ниже – таблица для 42:
expr  rem bit
42/2  21  0
21/2  10  1
10/2   5  0
 5/2   2  1
 2/2   1  0
 1/2   0  1

= (101010)2
Для остатка алгоритм, по сути, тот же самый: умножаем его на два (то есть делим на два в отрицательной степени). Если результат меньше единицы, пишем ноль и продолжаем. Если больше единицы, то пишем единицу, вычитаем ее и продолжаем.
Вот что получится для
0.515625:number *2 bit next 0.515625 1.03125 1 0.03125 0.03125 0.0625 0 0.0625 0.0625 0.125 0 0.125 0.125 0.25 0 0.25 0.25 0.5 0 0.5 0.5 1 1 - = (0.100001)2Итого – в двоичном виде
42.515625становится(101010.100001)2. Это все еще не конечный набор битов – впереди несколько других операций. Но уже на этом шаге видны некоторые проблемы. Я оставлю их на следующую заметку, а вы в качестве упражнения сделайте вот что: приведите к двоичному виду какие-нибудь числа вроде 1.1, 10.135 и так далее. Алгоритмы у вас есть.
Writing on programming, education, books and negotiations.